Projection Mapping – This isn’t what this house looks like at all

ProjectedOLDHouse

House haunted by Haunted Neurons – member of halloweenforum.com

Halloween Forum member Haunted Neurons has a great demonstration of what you can do to an otherwise normal house just by projecting an image onto it.

The stunning effects can be seen by clicking through to the forum.

I hope that you can see that the possibilities for something like this are almost endless.  Animated figures in the windows, flames, ghosts… whatever you can dream up can be projected onto the house.

Building a solid projector platform

Your projector platform is almost as important as your projector. It needs to be sturdy. Even a small movement from the wind at the projector will be magnified in the projection.

You want your projector to be easy to set up and sturdy so someone doesn’t knock it over while viewing your show.  Consider a 2×2 foot piece of plywood with tripod like legs and a ceiling mount that hangs underneath. This will allow for fine tuning with a sturdy and adjustable set of legs.  I tried 1″ PVC pipe as the legs in a setup like this but they proved too wobbly.  Go for at least 1.5″ or 2″ if you try this route.

You could build your own enclosure too. This year I’m aiming for that.  I’ve got a cemetery fence that runs along the front yard.  I’m building two columns to hold a gate.  The projector will be housed in one of the columns.  This way I can make it (mostly) weather proof too.

What Is Video Mapping?

Video mapping, also called projection mapping, is a technique that involves projecting an image on a surface that makes the surface appear different than it really is.   The video is “mapped” to the surface of the real 3D object so that it doesn’t look like a projection.  Often this requires adjusting the projection angle or even distorting the elements in the video so that when they are projected on the uneven surface, they do not look distorted.

colorfulHH
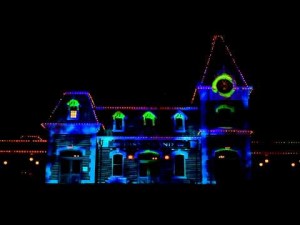
Surfaces can be highlighted with color like this photo to the right or they can even be made to appear to move with different shading effects.

Projector placement is key when setting up your effect because if the image that you are projecting is slightly off from what it’s being projected onto, your whole effect will be ruined. This is the most difficult part of the process. Use a camera lens that has the same lens ratio – or aperture – as the projector lens. Place the camera beside or on top of the projector lens, and shoot your picture.  What is  very important is that the camera lens is in exactly the same position as the projector lens because if it isn’t the projection will not look right.