Meet JackGPT—The World’s First Conversational AI Halloween Skeleton
Halloween decorations just got a major upgrade with JackGPT, an innovative AI-powered skeleton unlike anything you’ve seen before. Traditional Halloween props often rely on short, pre-recorded audio clips, which limits their interactions. But JackGPT changes the game entirely, bringing genuine two-way conversation to Halloween. Created by Dave Drake, an avid...
JackGPT Much Speedier – Upgraded with Vapi.ai
JackGPT was amazing in 2023 but there were two things I wanted to do with him in 2024. First I wanted to give him a design upgrade – make him taller and more spooky looking. Still working on that. Second, I wanted to reduce his latency – or the time...
JackGPT powered by ElevenLabs Amazing Voices
JackGPT couldn’t have existed without the proper voice. The skeleton prop is only half of the character. Unfortunately most of the stock voices out there sound like… well… stock voices. No character to them, no performance built in. You know Siri, Alexa and others. They just sound fake. When searching...
Selecting the right hardware can make your projection mapping project much easier. You should also think about projector placement and consider where your audience will be viewing from.
Halloween decorations just got a major upgrade with JackGPT, an innovative AI-powered skeleton unlike anything you’ve seen before. Traditional Halloween props often rely on short, pre-recorded audio clips, which limits their interactions. But JackGPT changes the game entirely, bringing genuine two-way conversation to Halloween.
Created by Dave Drake, an avid Halloween enthusiast, JackGPT is the talkative caretaker of the graveyard Drake sets up in this yard every year at Halloween. JackGPT can chat with trick-or-treaters on various topics, from Halloween lore to recipes and even sports trivia, his versatility as a conversationalist is truly unique. This animated skeleton doesn’t just talk; he also adds a bit of sarcasm to keep things fun, playfully teasing people’s costumes or offering his “bone-chilling” opinions on horror films.
Dave invested months perfecting JackGPT’s personality and humor. With OpenAI’s ChatGPT behind his personality, JackGPT is ready to offer Halloween visitors a highly entertaining, interactive experience. You can find out more about JackGPT on TikTok (@scare.labs), Instagram (@scarelabs), and YouTube (@Wackychimp), where he’s beginning to capture the attention of Halloween lovers worldwide.
Whether you’re a fan of clever technology or Halloween magic, JackGPT is bound to captivate audiences with his witty charm and interactive conversations. Check him out on social media to see the future of Halloween props in action!
JackGPT was amazing in 2023 but there were two things I wanted to do with him in 2024. First I wanted to give him a design upgrade – make him taller and more spooky looking. Still working on that.
Second, I wanted to reduce his latency – or the time it takes to process input from humans. Vapi.ai allows me to reduce Jack’s latency from about 7 seconds down to 1 second. Amazing!
I tested it by asking Jack the names of “those three kids in Nightmare Before Christmas”. I truly didn’t remember their names and this information was not included in his prompt. He gave me a correct, full response in less than two seconds. I then typed the same question into Google and it took just about the same amount of time.
What blows my mind about this is that in the 2 second time-frame, JackGPT was able to receive my audio input (the question), form an answer – in character – then pass it through ElevenLabs voice synthesis, and then perform/deliver the answer. We’re truly living in the future folks.
JackGPT couldn’t have existed without the proper voice. The skeleton prop is only half of the character. Unfortunately most of the stock voices out there sound like… well… stock voices. No character to them, no performance built in. You know Siri, Alexa and others. They just sound fake.
When searching for options I found that Eleven Labs had not just a few good voices, but seemingly unlimited voices that I could create with their tools.
And I don’t know how they even pull this off, but the character voices even have the proper inflection and delivery of a line. Give this example a listen – I did nothing to it other than type in the text to ElevenLabs text-to-speech tool. Astounding!
Controlling 3 foggers at once was a challenge I was excited to take on. I’ve always wanted the have continuous fog in my yard haunt. This gets me as close as I can without buying one of those $700 foggers – plus I get a nice big prop out of it!
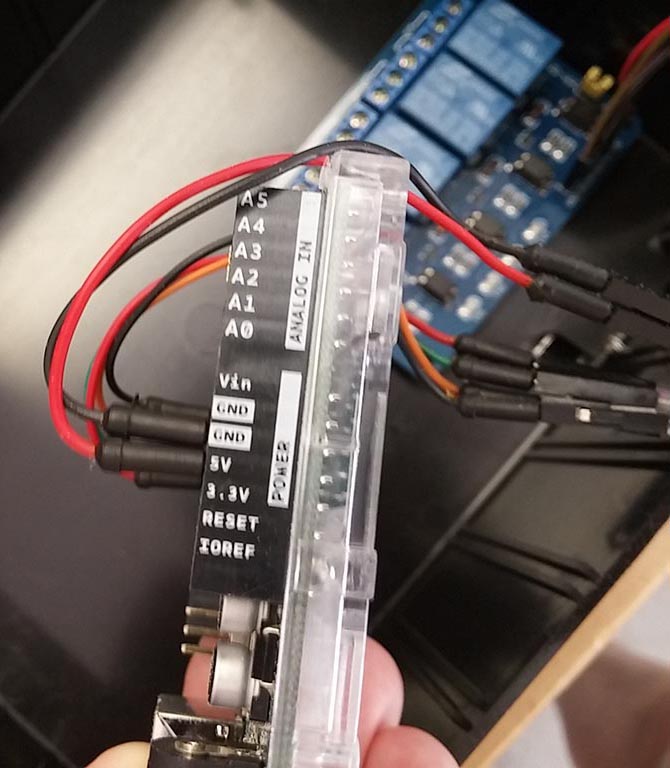
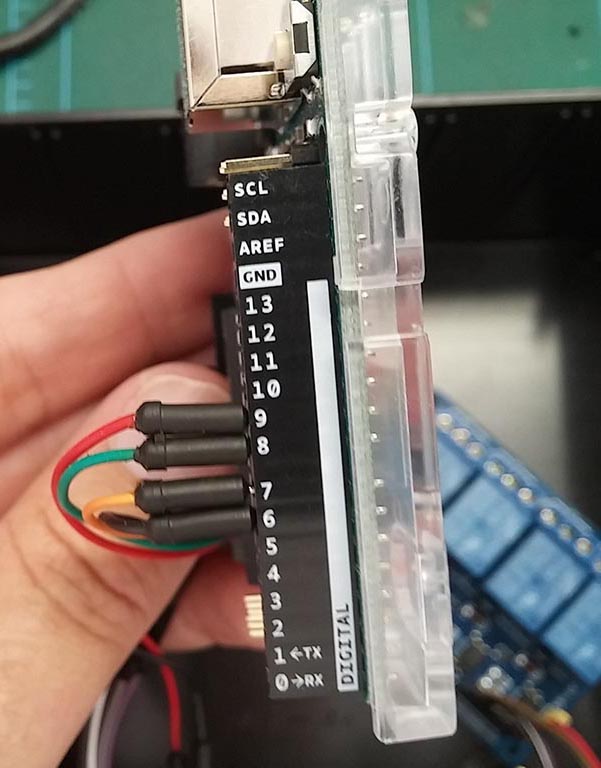
Controlling A Fog Machine with an Arduino
Don’t skip over this because you think Arduino is too difficult for you to learn. I’ll give you my scripts that you can use – or use as a guide to set your own up. There’s tons of Arduino help out there if you need it. We’re basically doing an on, off, on, off rotation – so nothing too complicated.
DISCLAIMER: I am NOT an electrician. I am a hobbyist who built something after watching a lot of videos and doing some research. After reading this, do your own research and do not proceed unless you are following all of the recommended safety procedures.
The plug-in controller that comes with the fog machine is basically just a button that you press when you want fog. We’re doing the same thing (pushing a button) but via a relay switch.
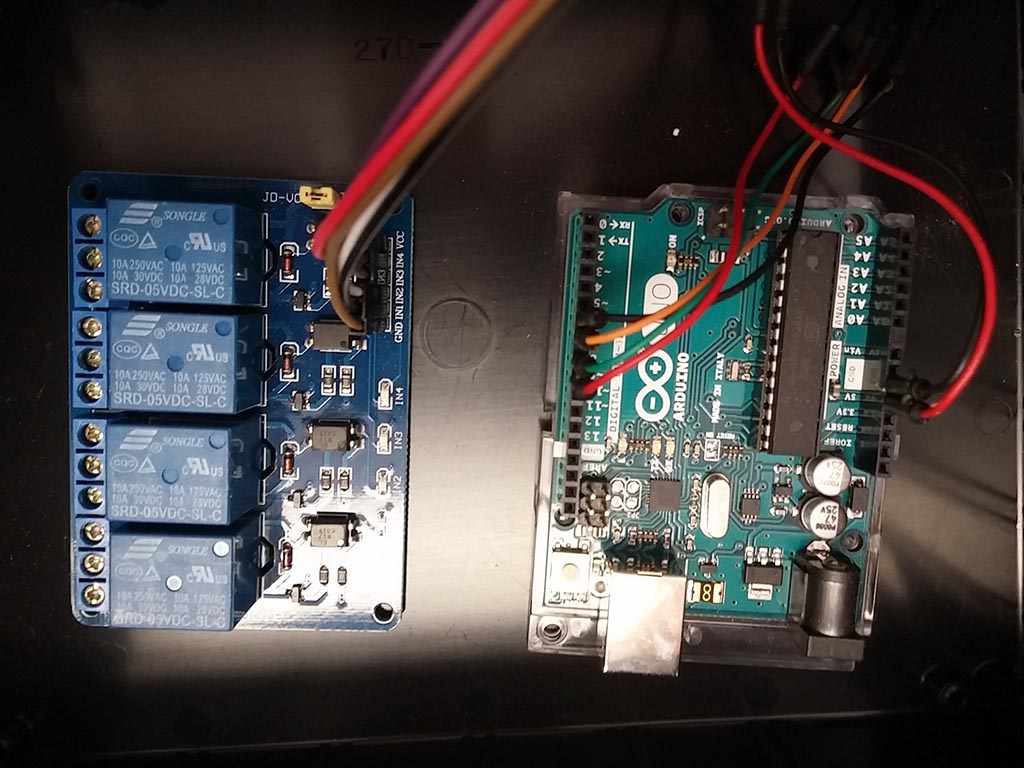
Relays on the left, Arduino Uno on the right.
Fog Machines Controlled by Relays
I’d never used a relay before this project. They’re really quite simple. They’re basically a switch that you can control via a computer program running on the Arduino. When the arduino wants to close the circuit on a relay it sends a signal to the relay and it closes – making the connection – basically like pressing the button on the fog machine controller. Find out more about controlling a relay module with arduino.
The less expensive 700 – 2000 watt fog machines need about 3 minutes to cycle through from one burst to the next. This waiting cuts into my need for continuous fog.
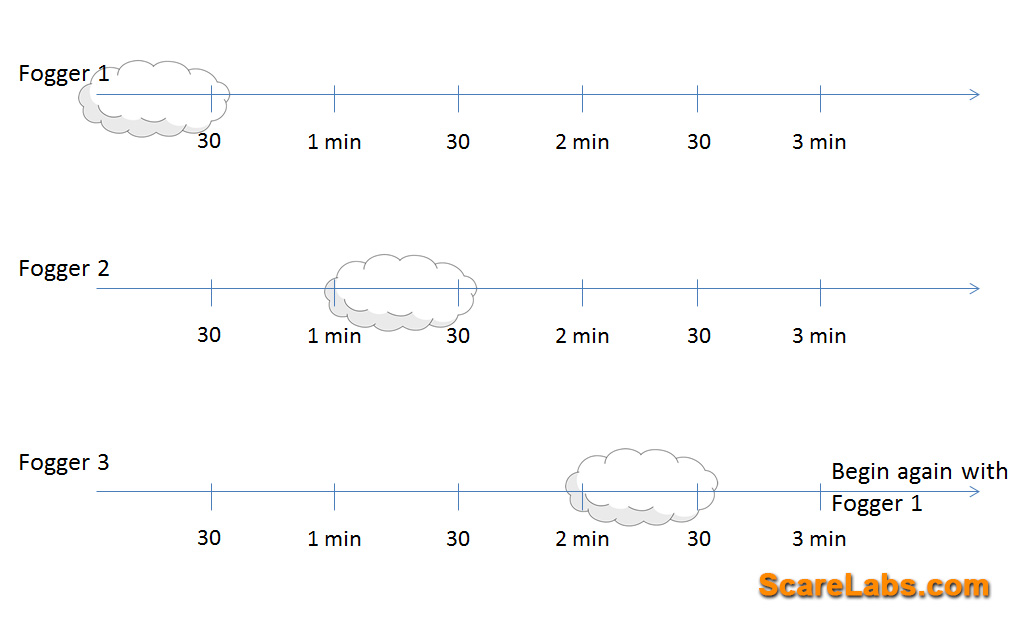
With an Arduino you can basically have 3 foggers on a 30 second interval that loops indefinitely (or at least until you run our of fog juice). The arduino code is basically this:
Turn on fogger 1
Wait 30 sec
Turn off fogger 1
Wait 30 sec
Turn on fogger 2
Wait 30 sec
Turn off fogger 2
Wait 30 sec
Turn on fogger 3
Wait 30 sec
Turn off fogger 3
Wait 40 sec (I gave it 10 sec more padding in here to allow the foggers a little more “off time” to recoup.)
Repeat
A quick diagram showing fog for 30 sec, all off for 30 sec, fog for 30 sec, all off again. Repeat.
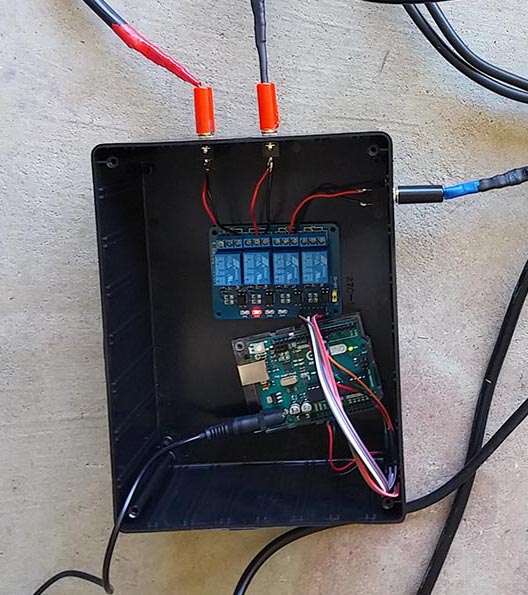
Hooking Up A Fogger to a Relay
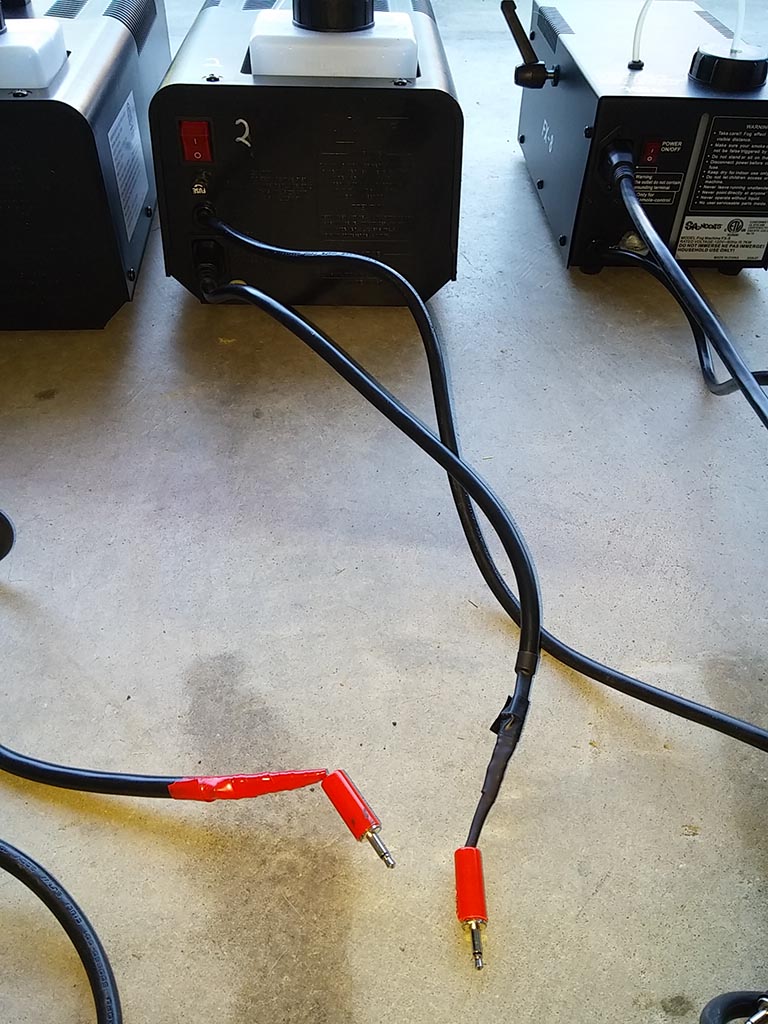
Last year I did a quick & dirty version of this with my electronics in a tupperware container and all wires hardwired right into the relays. This year I tried to make it a little more elegant and allow for 1/8” 3.5mm Headphone Jack mono plugs to connect the foggers to the controller box.
Cables hacked to headphone jacks. They actually have heatshrink tubing under the electrical tape, so they’re not as flimsy as they look.
My foggers’ control boxes connect with a 3 prong plug that is also commonly used as a PC power cord. I just cut off the other end and found the 2 wires that when connected, caused the fogger to start. I used a multimeter to see which wires to use. WARNING you can get shocked if you don’t know what you’re doing. Watch some videos to learn how to use a multimiter to find the correct wires.
These plugs then plug into ports on my controller box. They are basically a headphone jack with each wire soldered to each side of the plug. This carries the signal from the relay to the fog machine control port. Its the same as touching two bare wires together to make the connection but it’s a lot cleaner and easier to set up this way.
The relay controller board takes input from the arduino and closes each relay when told to. The relay boards can be found on any electronics site and even Amazon.
I have a 4th relay on the block but am not currently using it. Red light comes on when that relay is active. In this pic it was #2.
Remember these are all just on the control side of things so it’s much lower voltage. The power being supplied to the fog machines is still coming from your standard 110/120 plug.
Power (and ground) for the relays coming from the 5V on the Arduino (this does NOT power the foggers – they still plug into the wall like normal). Arduino has its own plug via USB.
So we are basically sending an “ON” message to Pin 7 to control fogger 1, then an “ON” message to pin 8 to control fogger 2…. etc. These 3 pins plug into your relay board and switch it on and off.
You’ll see in the code that Pins 6,7,8 and 9 control the relays.
This is the basic construction and all the components you’ll need. Coming in the next post – the Arduino code!
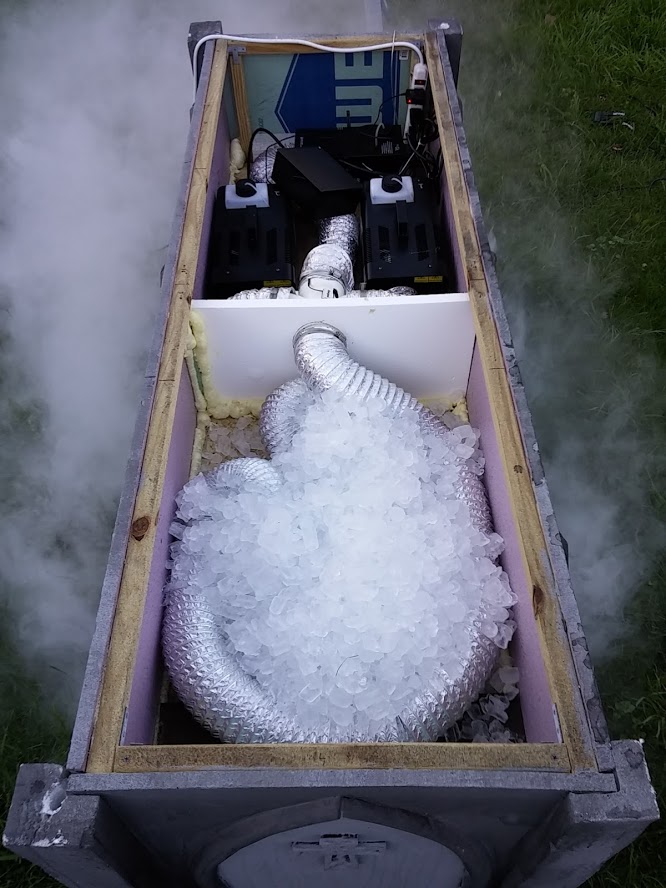
My Halloween dream for many years has been unlimited fog for my front yard graveyard haunt. I usually set up a fence along the sidewalk and have a bunch of tombstones and other scary Halloween props in the front yard. I’ve run 3-4 foggers on individual timers but they just couldn’t keep up and no matter how hard I tried, the timers wouldn’t synch up. So I’d have a lot of fog and then 2 minutes later have nothing. I needed a complete system for continuous fog.
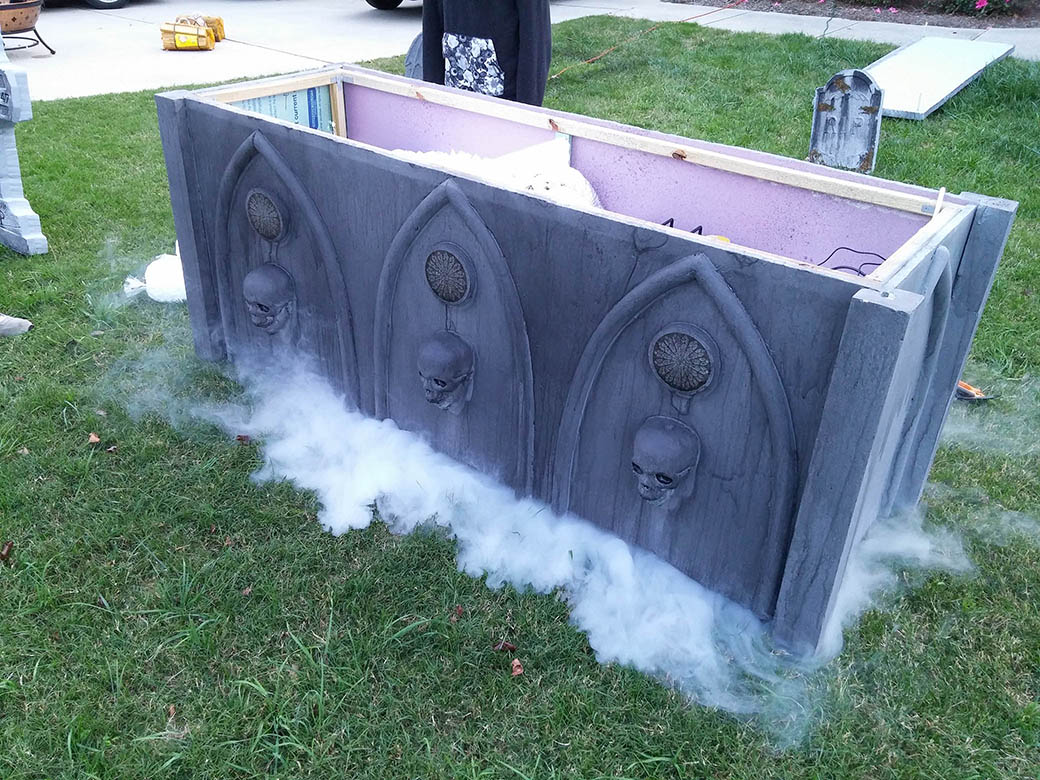
Tomb Fog Chiller
To help your fog stay around you need a fog chiller to cool the fog after it leaves the fog machine. I’d done trash can fog chillers in the past and they work ok but then you have a big black trashcan in your haunt that you have to incorporate or hide somehow.
This tomb fog chiller has 3 foggers connected to an Arduino micro-controller and controlled by relays. This method allows one fogger to fire off for a full 30 seconds, then the next, then the next – so I can have (nearly) continuous fog.
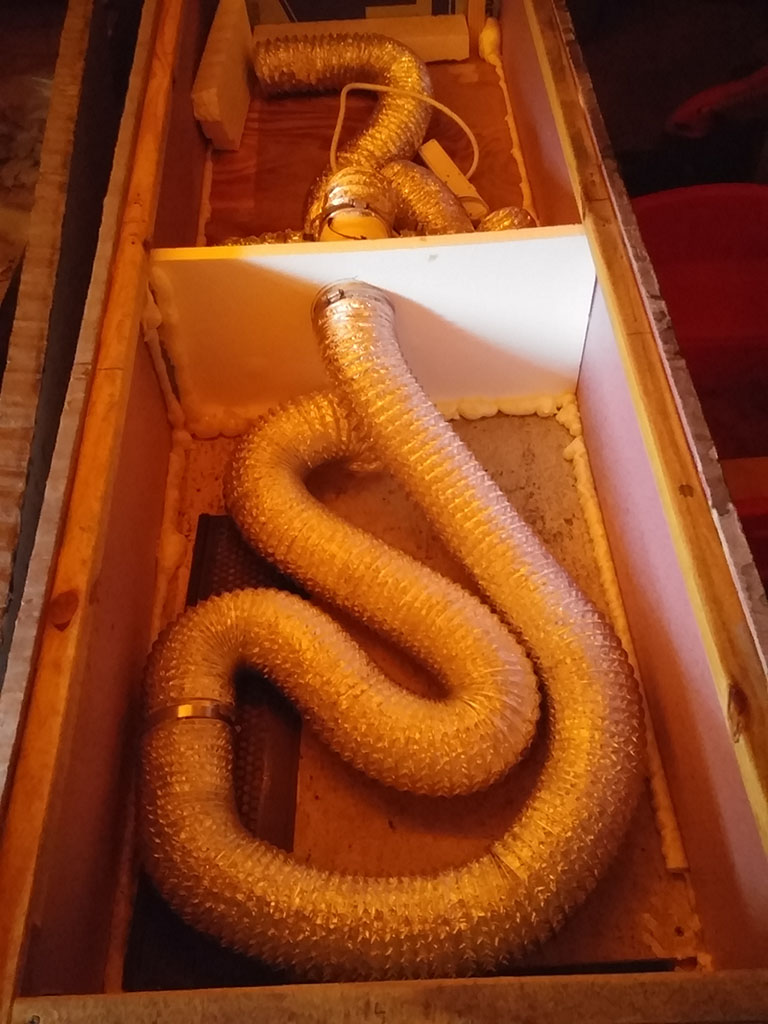
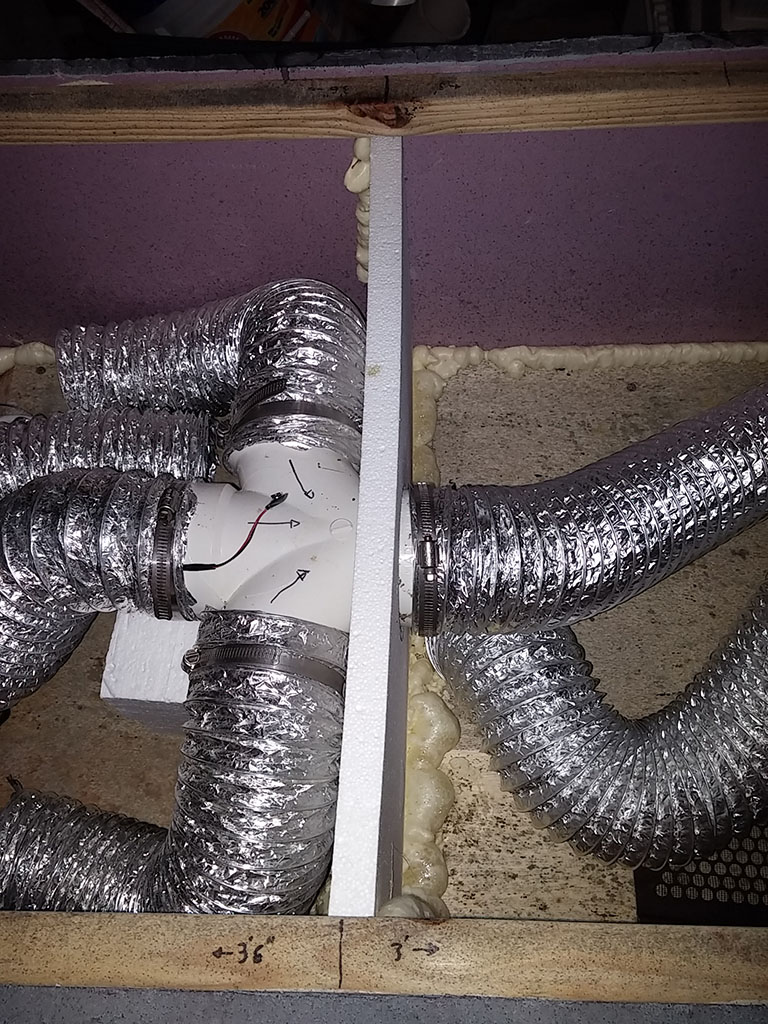
The idea was that foggers on one end would all feed into a tube that carried the fog into the “cooling side” where it snaked around, cooled under 5-6 bags of ice, and was then dumped into the bottom chamber to be released at ground level.
Building a Fog Chiller
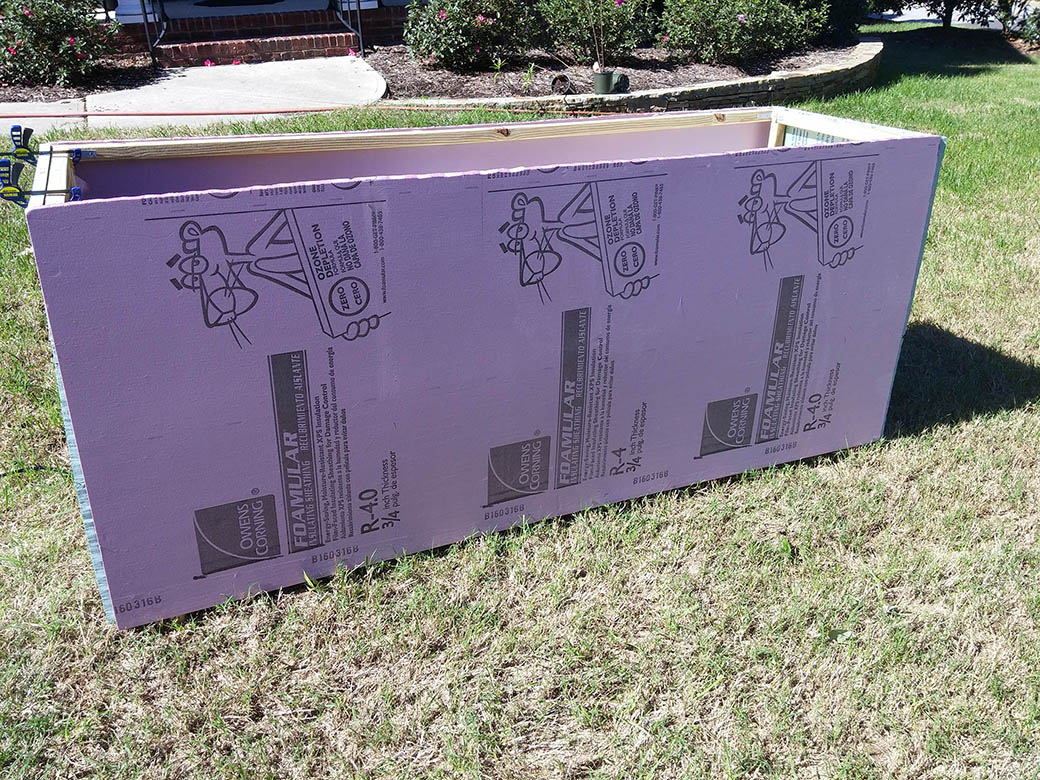
I’d done foam sculpting before with some tombstones and had good success with foam board. This project, however, was going to require a wooden frame as a skeleton (as it were). Having no plans to work from I set out to construct this box.
Dimensions are 75″ long by 22″ wide by 36″ tall
The box is cut in half twice: longways, to form a top & bottom – the top is where the fog machines, electronics and ice sit. The bottom allows the fog to emanate from all sides at once. The top section is also cut in half to separate the ice from the electronics. Sorry, I don’t have the foggers in the photo below.
Fog comes from the far side, through the wall, snakes around this end under ice and then out the bottom.
The internal wall is just a piece of super dense foam I got in some packaging. It’s much harder than your typical styrofoam (not sure why & I don’t remember where I got it). Cut to allow 3 inch PVC All-Hub Double Sanitary Tee joint. Three foggers on the left alternately pump into the iced chamber on the right.
3 foggers feeding into the ice chamber
I should point out here that you can see a 9V battery plug on the center part of the junction. This powers a small PC fan that pushes the fog in the right direction through the ice.
The crypt had to sit 3 inches off the ground in order to let out the fog from the bottom. I probably should have built that into the framework but since I didn’t know how tall it needed to be, I added the feet later.
I used liquid nails to attach pink insulation foam to the frame. That worked out pretty well and everything held in place nicely. Pink Panther… not so scary.
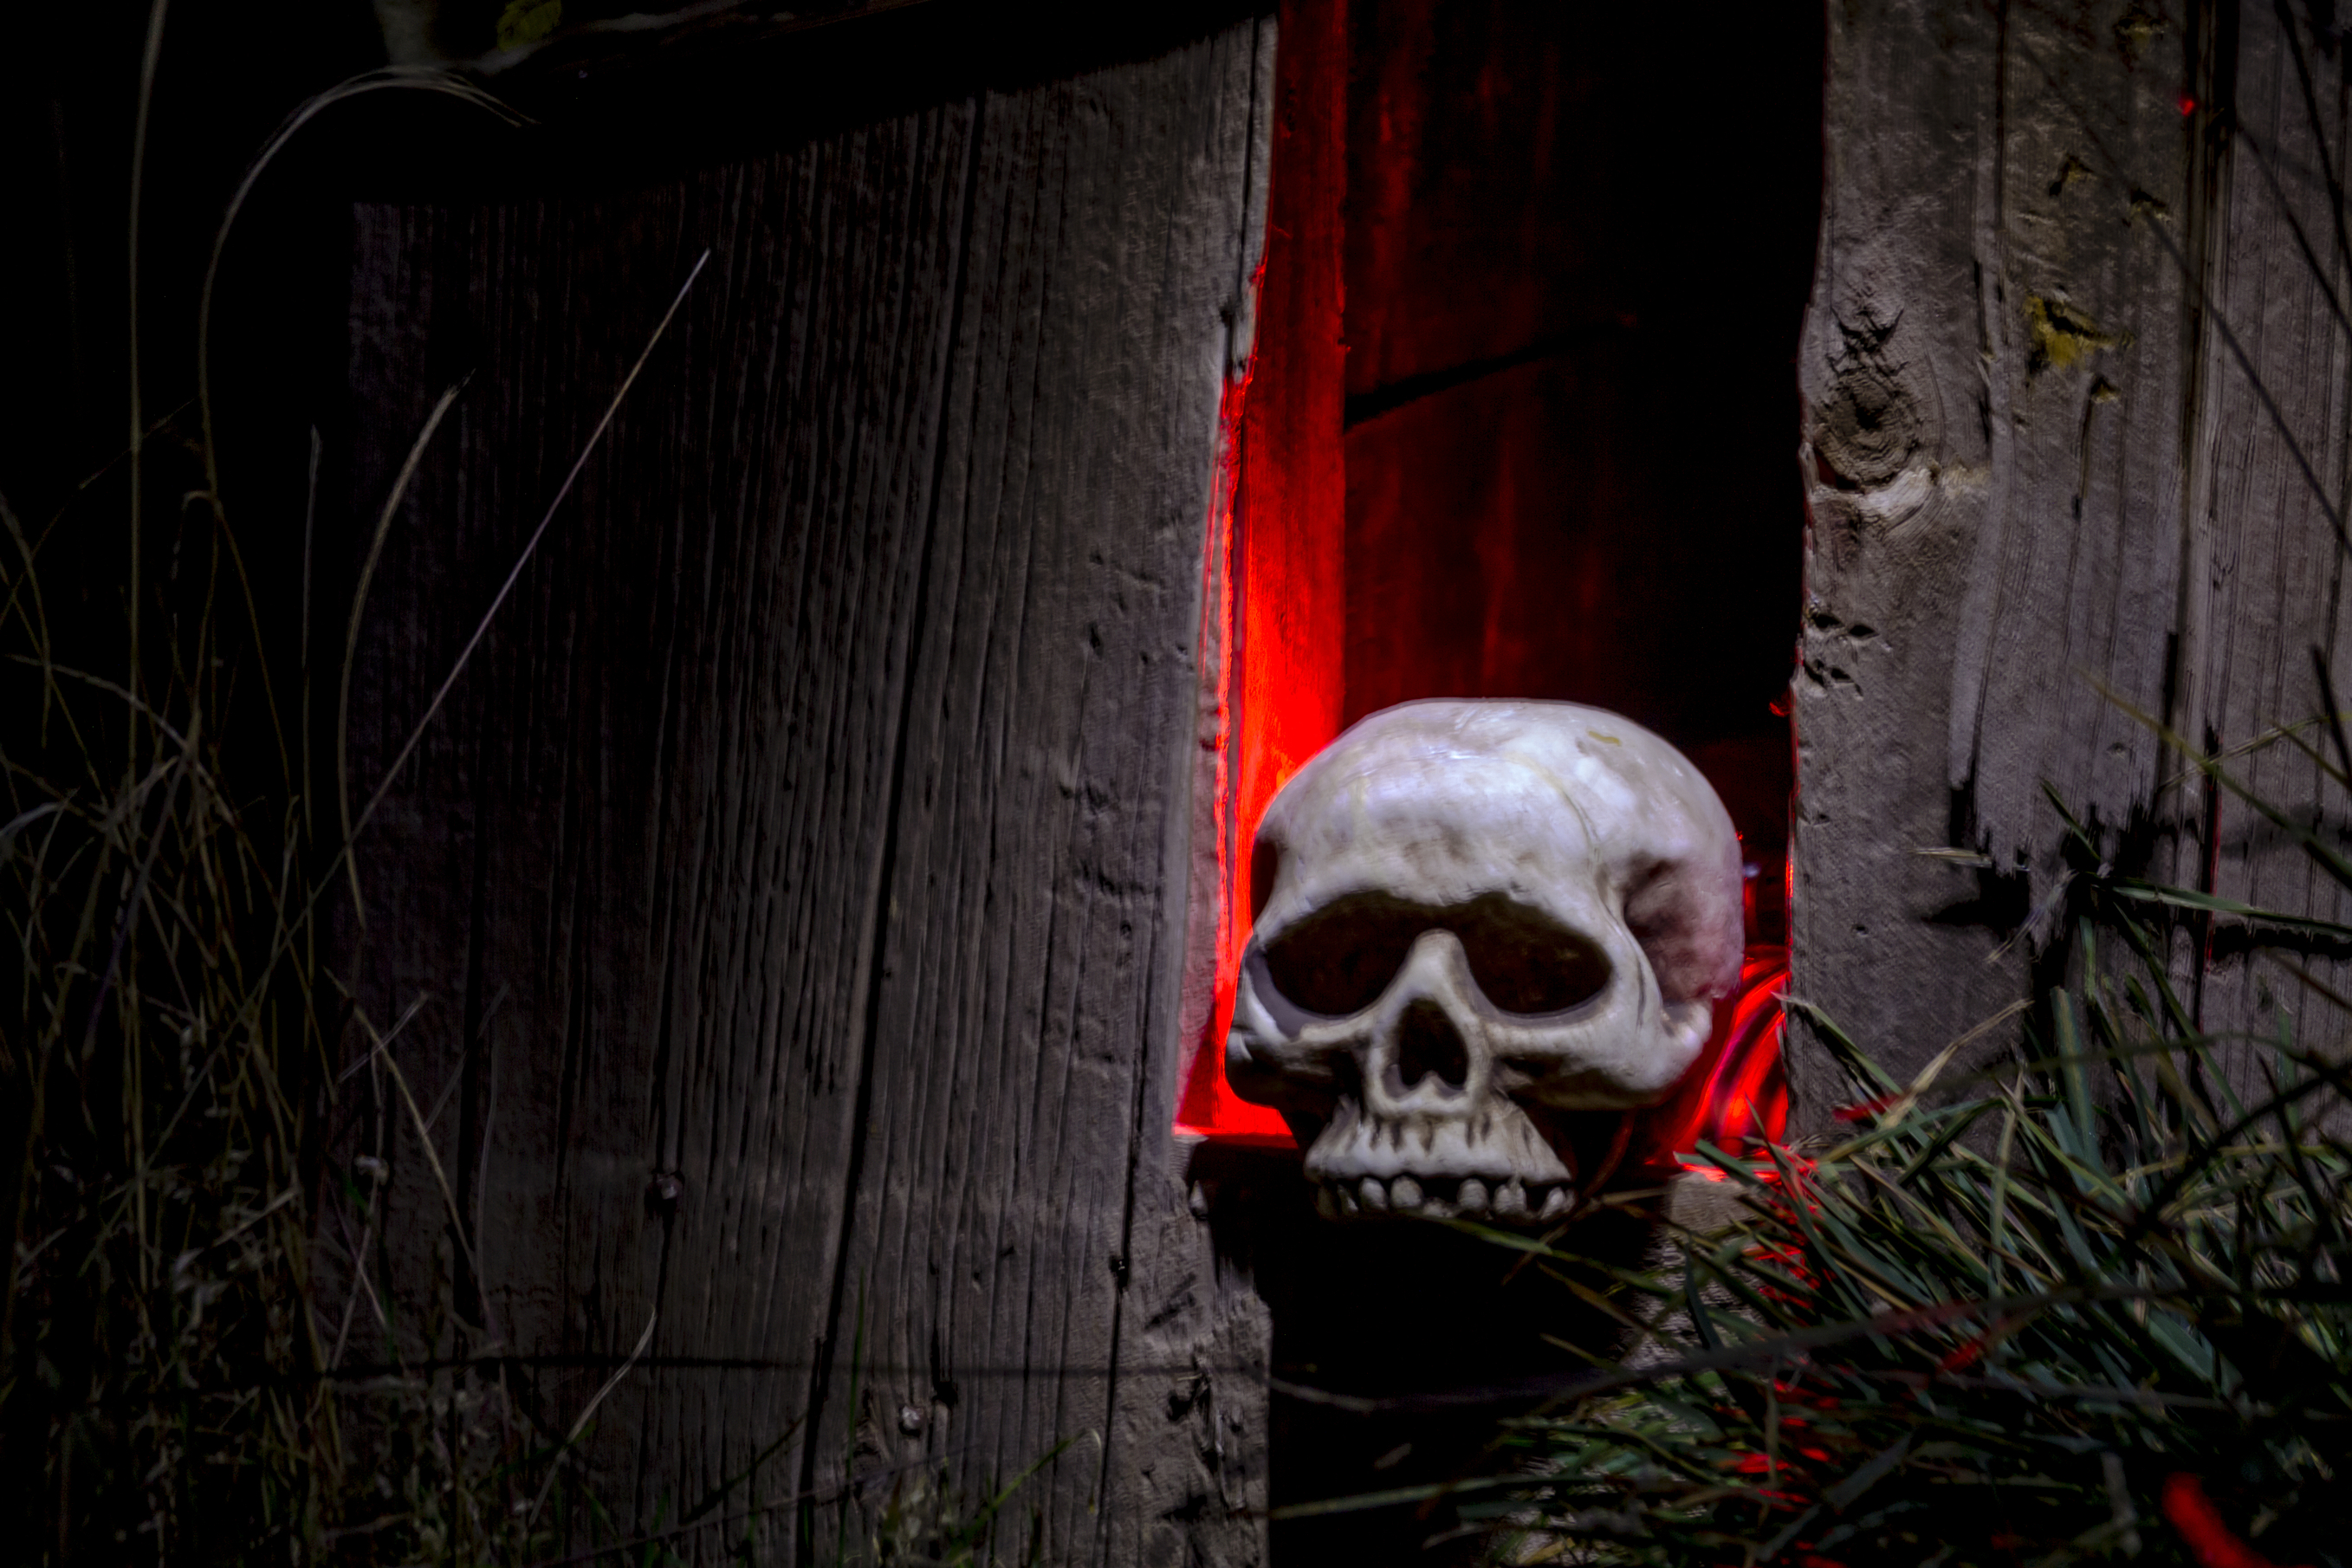
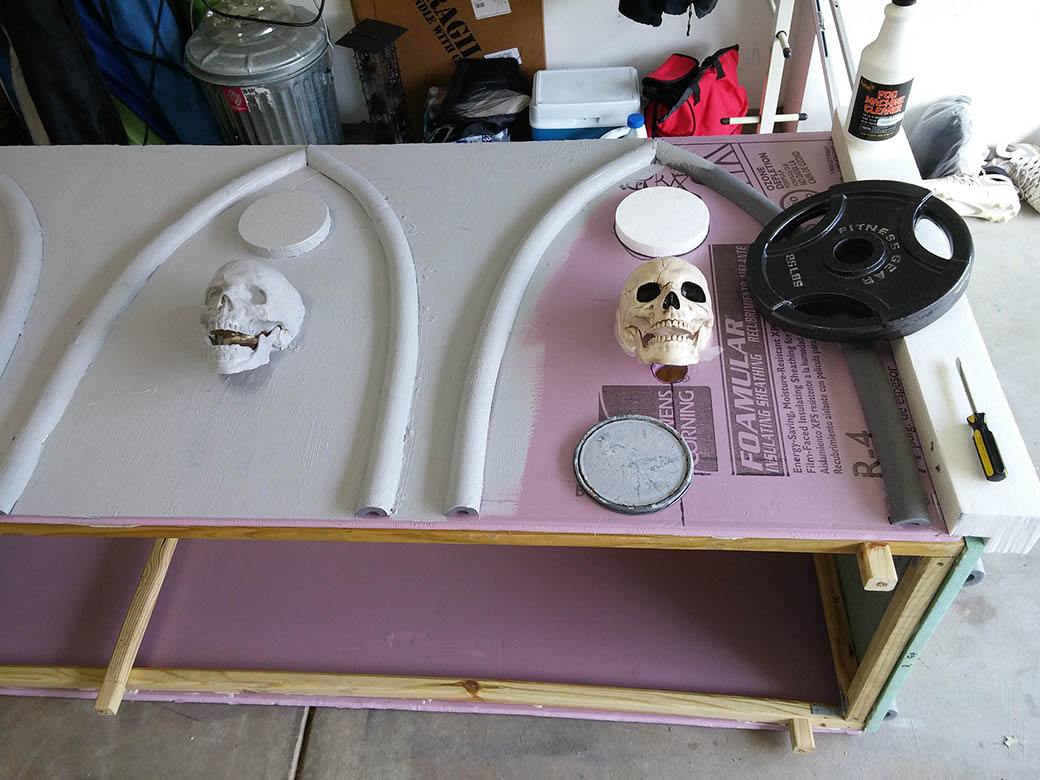
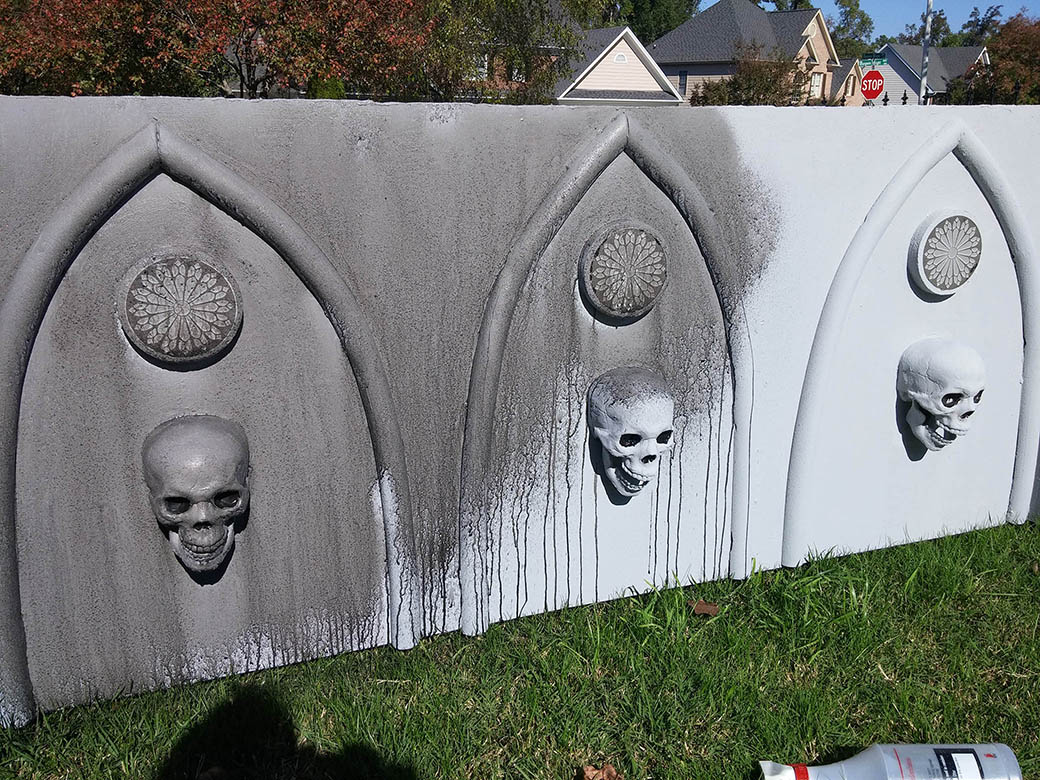
Now it was time to decorate it. I found three skulls for $10 each and cut the back half of the skull off so they could be mounted flat. The arches are pipe insulation split lengthwise (like a hot dog bun). It was trickier than I thought to get the three arches to have the same curve to them. I had to redo the middle one a few times.
I found some foam discs at the craft store that I used to create some raised Gothic rosettes. Also two wooden carved crosses to add to the look. Coloring didn’t matter as they were all going to get a coat of paint.
Holes to be cut behind the mouths for fog to escape
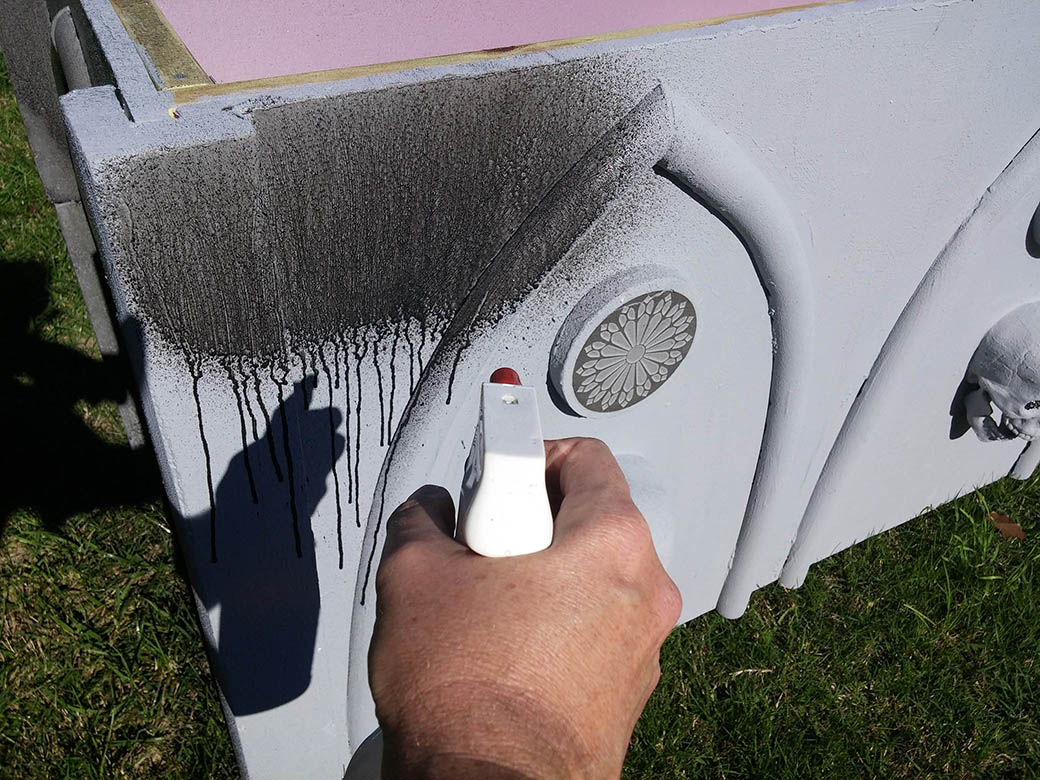
Next up was to paint. I use a mixture of Dry-Loc and black paint to make a dark gray, hard coating for the foam. Works great on my tombstones. I use about a half cup of black paint in a full can of white Dry-Loc. You can adjust accordingly for your color needs. Buy a paint mixer that attaches to your cordless drill. Thank me later.
Holes behind the skulls’ mouths to let fog escape.
Final stage was weathering. For some reason, I love this part. If you don’t, give me a call and I’ll come do yours. You start off with something clean and new looking and then get to trash it! What’s not to love?
I fill a spray bottle with water and about a table spoon of black paint. Then just spray it liberally all over the whole thing. Usually takes 2 – 3 coats and you can focus on different areas to simulate where the natural weathering would take place. Once it dries it’s much lighter in color. The first coat can show you where to focus your next coats.
That’s about it for this step. Stay tuned for the next post where I outline running 3 foggers on a timer with the arduino controller.
I saw this idea on Facebook (of all places) and had to give it a shot. I’d kept my bottle of Crystal Head Vodka for a few years and, being a Halloween nut, I knew I was going to do something cool with it but never got around to figuring out exactly what. When I saw this idea I instantly knew where it was going in our house – in the creepy stairwell to the theater room.
It was amazingly simple to build. Of course, here’s the part where I tell you to follow manufacturer’s instructions and to never work on electrical outlets in your house without first turning off the power. There are tons of references online for replacing a lighting receptacle safely so you should familiarize yourself with the process.
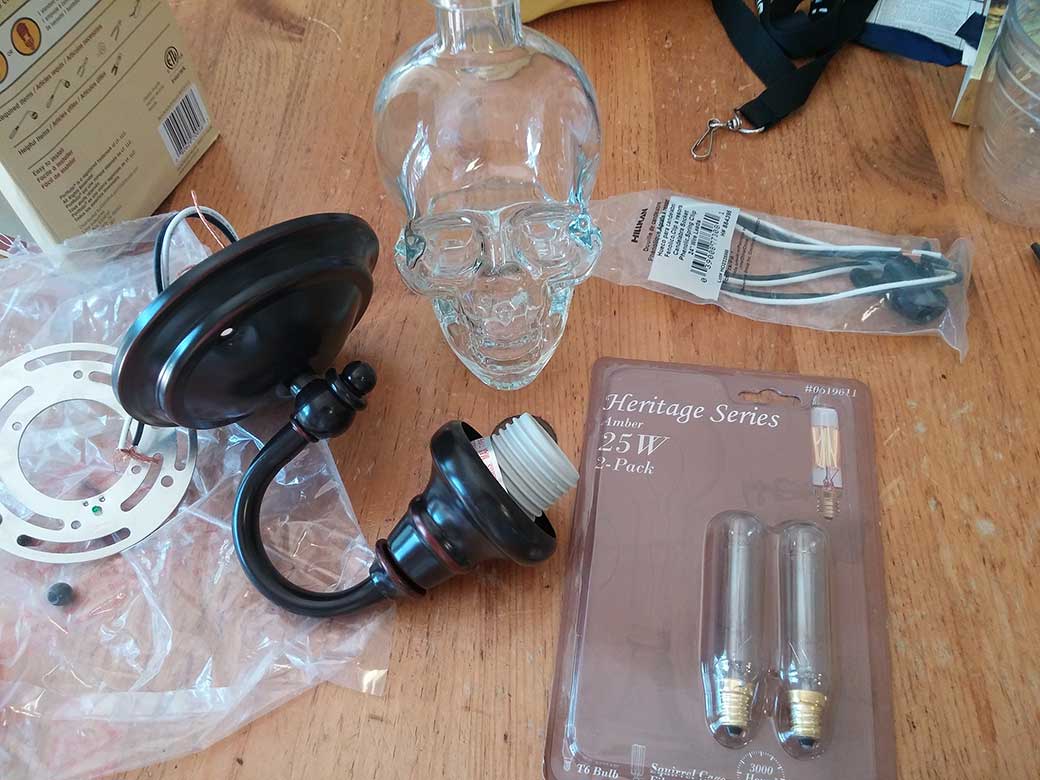
All of the pieces.
Getting the parts list together was as easy as hitting my local home improvement store. I found:
Crystal Head vodka bottle (enjoy the vodka on a different day than your build and be sure it’s washed and dried)
a Hillman candelabra socket with 24″ wire leads and a spring clip
a candelabra sized light bulb – can’t be more than 1 inch wide and 4 inches tall. Pictured are 25W bulbs but I found this 40W warm white LED bulb on Amazon and went with that instead.
Three 2 inch #6 machine screws for attaching the skull to the fixture – length can vary depending on your light fixture size. I got 2 inch and cut them down a little.
Tools like pliers, screwdrivers and wire-strippers
That’s it! You’re ready to go. I think the whole lot cost me around $30 not including the Crystal Head Vodka.
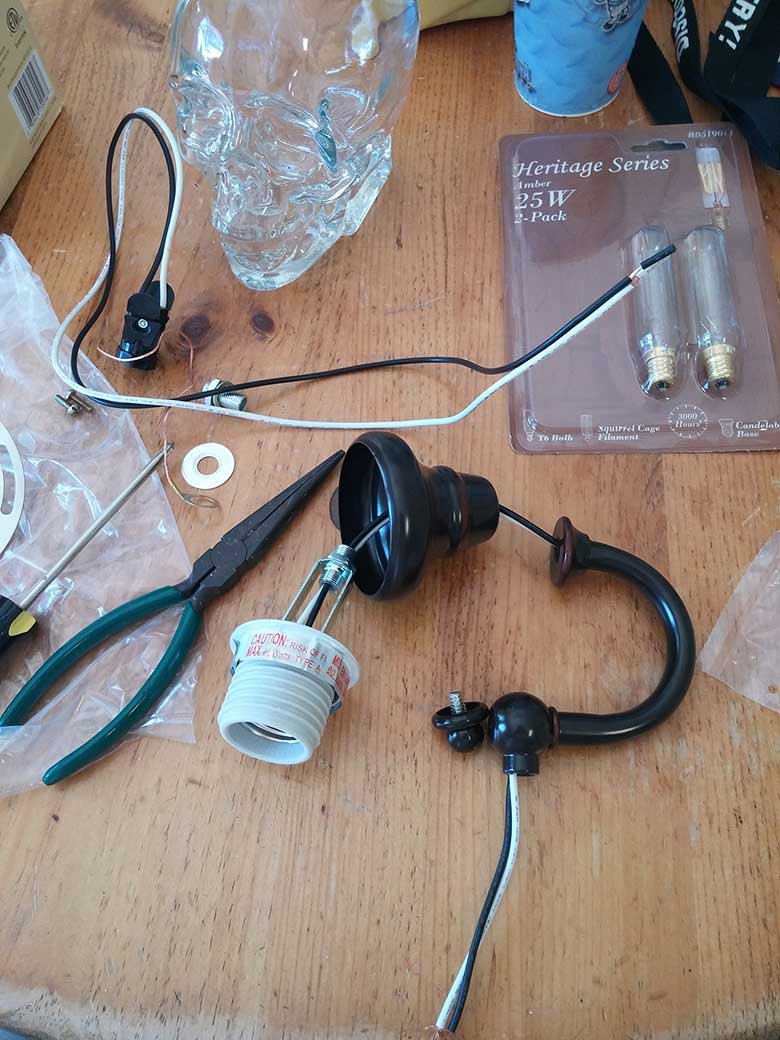
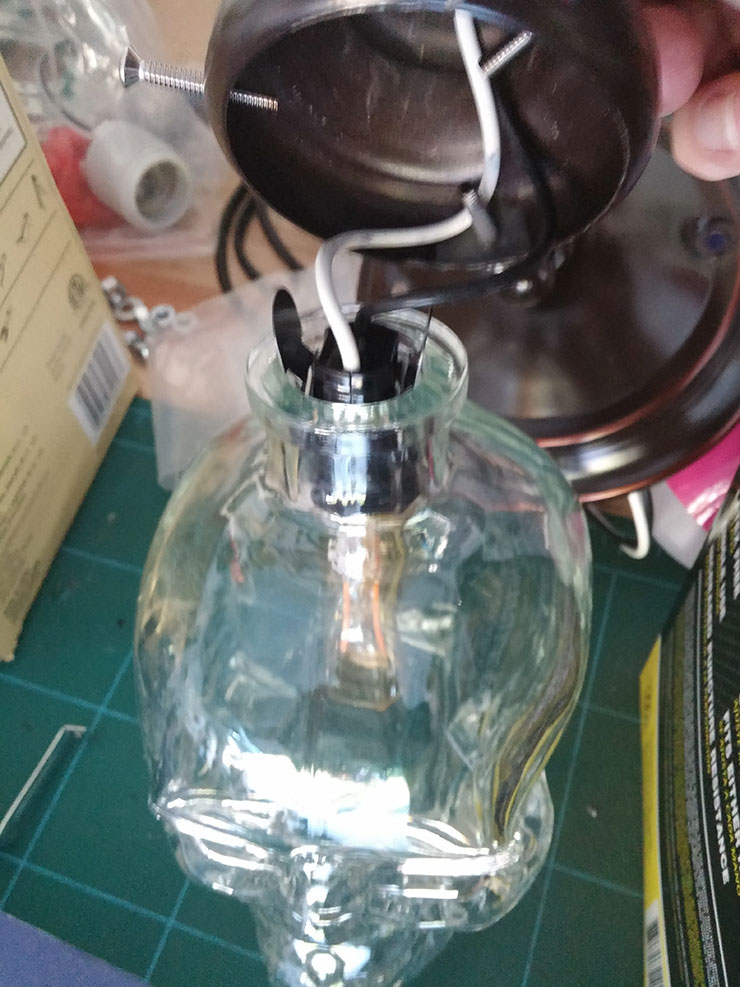
Step 1
Remove the existing bulb socket. It’s too large for the Crystal Head bottle. That’s why we needed the candelabra socket. This one just took a few screws to remove and I pulled it right out.
Step 2
You may be able to skip this step depending on the fixture you choose. I was worried about threading my new wires through this little neck so I clipped off the socket and attached the old wires to the new and used them to pull my new socket’s wires through.
Step 3
There you have it. The new socket clips in and holds the bulb steady. This does NOT support any of the weight of the glass skull. That happens in the next step. The spring clips are just enough to hold the bulb in place.
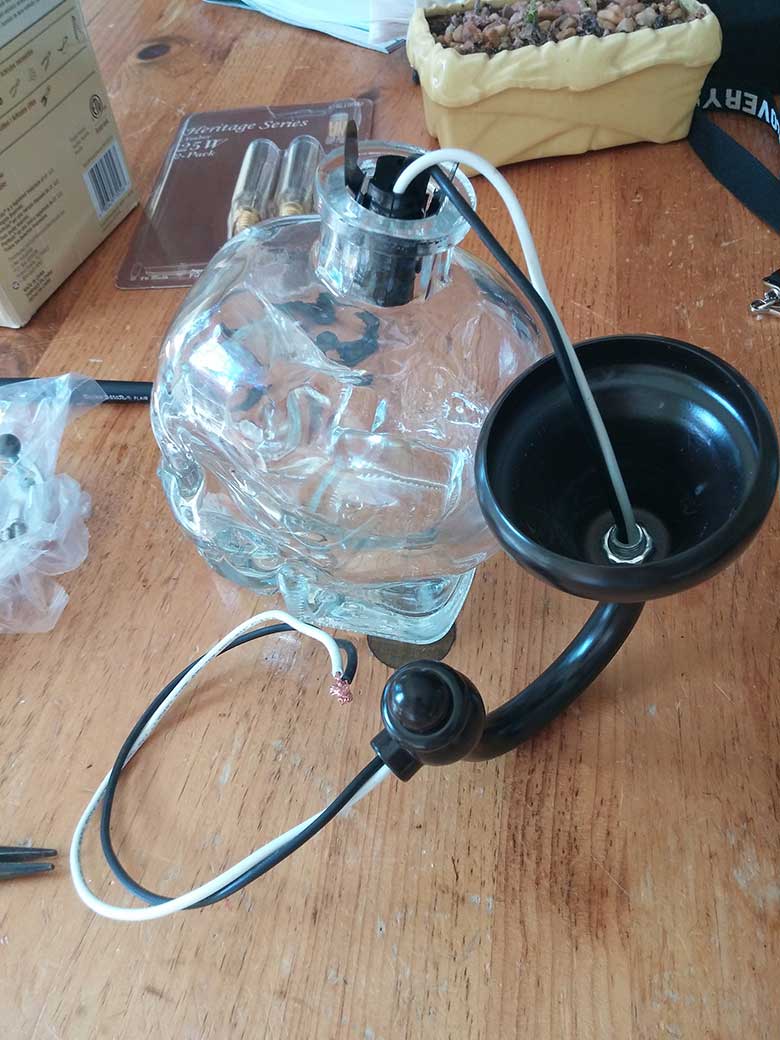
Step 4
I figured the easiest way to attach the crystal skull was similar to the way most globes are attached to ceiling fans – via 3-4 screws that come together to “pinch” the globe in place. I didn’t want to try to permanently attach the skull becasue I’d need to replace the bulb every so often. This fixture didn’t have those screws so I drilled 3 holes and put my own machine screws in.
Step 5
Mount the fixture according to manufacturer’s instructions. Flip the light on and congratulate yourself on an amazing light fixture.
I will probably go back and do some more “weathering” to the fixture to make it look rusty and old, but I was too excited to get it mounted and see how it turned out. Overall I’m thrilled with the way it looks in my house.
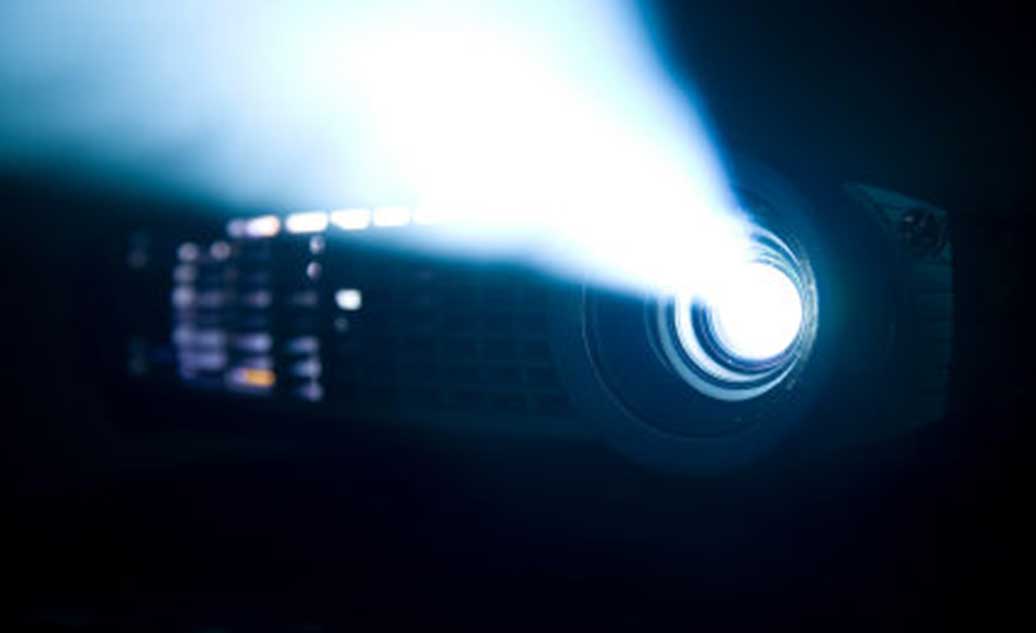
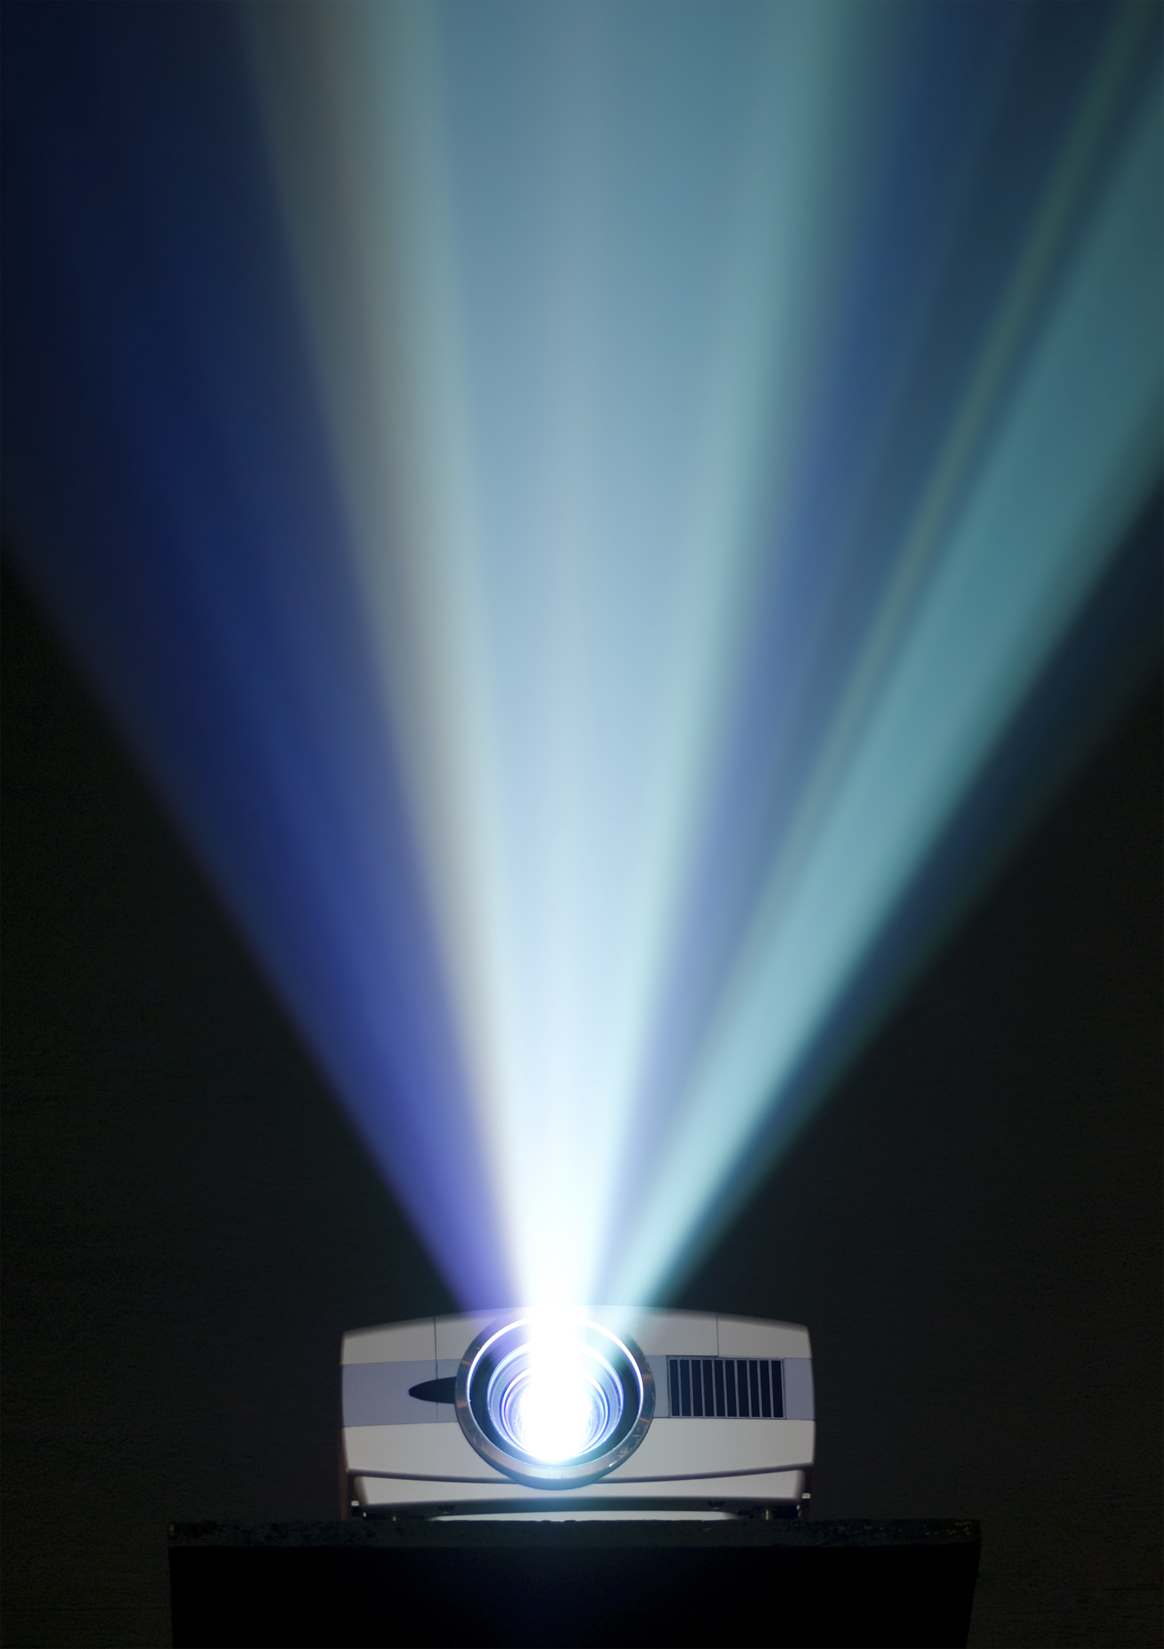
How Do I Find the Right Projector for Projection Mapping?
When looking for a projector for use in home projection mapping, there is no one-size-fits-all solution. I wish I could just tell you to buy the Sony ABC45J or Panasonic MX4 projector and you’d be ready to go (BTW both are made up model numbers).
The problem is you’re working in a very un-ideal environment. Outdoor projection onto a surface that wasn’t meant for projection is going to bring its own unique set of challenges for each different house. My house has a brick facade and is one house down from a street light. Your house might be white siding on the front and be in complete darkness. We’d have different success with different projectors. What I’m hoping to offer here is some general things to look for when choosing a projector.
Get all the lumens!
Lumens
Regardless of our differing houses, the one thing you can hang your hat on when is comes to video mapping your own house is this: the more light the better. Since we do face this problem of different situations with our house colors, ambient light, differing throw distances, etc. we need to dump every photon we can on our house to try to overcome these problems. You won’t want to go below 2000 lumens and 3000+ would be better.
The professional displays you see on YouTube are using 10,000 and 20,000 lumen projectors. In many cases they have to have that because they’re projecting onto three or four (or ten or twenty) story buildings. So hopefully we can benefit from our smaller scale.
The best thing to do would be to test out a few different projectors on your house. Borrow from your workplace or a friend and see what it does.
Contrast Ratio
Along with lumens you’ll see contrast ratio listed. They’ll be big numbers too… 20,000:1 or even 50,000:1. This leaves you with the question, “which is more important?” when comparing projectors. If you’re looking at one projector with 3500 lumens and 5,000:1 contrast ratio and another projector with 2700 lumens and 50,000:1 ratio – which do you choose?
The short answer is this: stick with lumens. Contrast ratio can differ between manufacturers and technology types (auto iris, color wheel, etc.). Ultimately its the difference between your blackest black and whitest white. This hurdle won’t be your biggest when trying to project outdoors. You’re not going to be watching the Avatar Blu-Ray on the front of your house and trying to discern the colors of the bioluminescent plants in the forest. You don’t want to ignore contrast though. Some older projectors might offer only 500:1 and you might be left with a washed out image.
Hardware Costs
A huge factor in buying a used projector is the cost of replacement bulbs. These can be anywhere from $80 to over $300 for a single bulb. Always check the cost of replacement bulbs when shopping for a used projector.
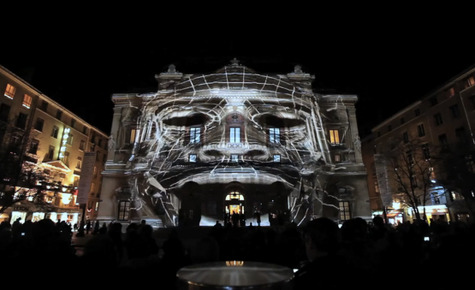
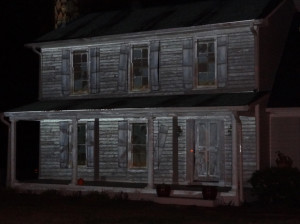
House haunted by Haunted Neurons – member of halloweenforum.com
Halloween Forum member Haunted Neurons has a great demonstration of what you can do to an otherwise normal house just by projecting an image onto it.
The stunning effects can be seen by clicking through to the forum.
I hope that you can see that the possibilities for something like this are almost endless. Animated figures in the windows, flames, ghosts… whatever you can dream up can be projected onto the house.
Your projector platform is almost as important as your projector. It needs to be sturdy. Even a small movement from the wind at the projector will be magnified in the projection.
You want your projector to be easy to set up and sturdy so someone doesn’t knock it over while viewing your show. Consider a 2×2 foot piece of plywood with tripod like legs and a ceiling mount that hangs underneath. This will allow for fine tuning with a sturdy and adjustable set of legs. I tried 1″ PVC pipe as the legs in a setup like this but they proved too wobbly. Go for at least 1.5″ or 2″ if you try this route.
You could build your own enclosure too. This year I’m aiming for that. I’ve got a cemetery fence that runs along the front yard. I’m building two columns to hold a gate. The projector will be housed in one of the columns. This way I can make it (mostly) weather proof too.